
You may use one of the below methods:
<1> Data line or Bluetooth: copy the APK file into SD card and install it by connecting your computer and Android phone (so does Andriod Emulator, only does it use some software to connect) with them.
<2> Web server: create a web server on PC and put the APK file in one of its directorys, next visit the web and open the downloading webpage to download the APK into SD card via WiFi or other Network on the android-powered phone (so does Android Emulator).
Note: The emulator is as same as the visiable Android-powered Phone. Merely emulator provides much convenience for APP developpers to test in local computer. Next, I will tech you how to install an Android Emulator in your computer.
1 The Android Emulator requires JDK (Java Development Kit), download them from the link:http://www.oracle.com/technetwork/java/javase/downloads/.


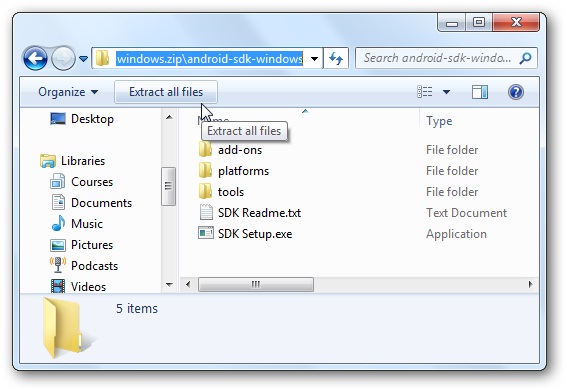
2 Then, download the Android SDK from this link: http://developer.android.com/sdk/, and make sure to select the correct version for computer. Once it's downloaded, unzip the files as normal.

3 In below Window, run the SDK Setup.exe to get started running Android on PC.

4 Wait a while, the SDK are checking Google's servers for available packages.

5 In below window click the tab "Settings", if face to an SSL error message. We uncheck the checkbox: "Force https box...", click "Ok", and then reopen the setup.

6 The Package Installer pop up. You should choose what you need to install, and then click button "Install" to set up the Android emulator on computer.

7 Acquiescently, all of the SDK platforms, samples, and APIs will be selected for installing. It would cost quite a while to download, as several versions of Android are currently available. Then click the "Reject" checkbox, and then click button "Install". The below illustration show the version 2.2. You could download the latest Android 2.3 as well as the older 1.6.

8 Once you’ve started installing, you’ll wait a while for the download and installation progress.

9 Setup an emulator to test the Android on computer. Select the "Virtual Devices", and then click the button "New" on the right edge.

10 Enter a name for the virtualized Android, and select the version of Android from the drop-down menu.

11 Enter number for the size of SD Card which is a virtual SD card that's actually an IMG file that Android will use to store users' settings and files. Then, select a screen size from the "skin" select options. The default is a standard, Nexus One-type display, while the others are different sizes for diverse device.

12 Next, click button "Create AVD".

13 Wait a moment for the freezing of the program while it is creating the AVD, so just wait until the confirmation window comes up.

14 Now ready to run Android, select a new virtual Android, and click Start on the right edge.

15 Scale the display window, and then click button "Launch".

16 On emulator Android begins to load.

Note: Android may take a moment to load, especially on the first run. After a while, the boot screen will switch to an Android boot animation.
Android home screen comes up. Click any APP to launch but double-click.

You can open pre-installed apps from the launcher menu, though unfortunately these emulator images do not include the Android Marketplace.

I will tell you an easy method about how to install the output APK into the Android emulator.
Note: You can find the adb tool in <sdk>/platform-tools/.
Precondition:
<1> Firstly, you must confirm that you have launched the Amulator.
<2> Secondly, find out the directory of the adb.exe.
<3> Thirdly you should know where the output APK file.
Now click "Start" on the down-left cornor of your screen, and enter letters "cmd" in the searching form , enter to the command line black window and enter command line.

<1> Enter command line: cd C:\Program Files\Android\android-sdk-windows\platform-tools (adb.exe root directory, you should enter your correct directory).
<2> Enter command linse: adb devices
<3> Enter command lines: adb "the directory where your APK files saved" (Note: you must enter the double quotation marks if your output APK file name contains blank space, otherwise it won't work normally) .
Note: now you have installed the APK file into the emulator, you could begin to test it.